

I Replaced My Entire LUT Collection With This One Plugin (Here's Why)
Dehancer Pro is a $449 film emulation plugin that goes beyond traditional LUTs by modeling the entire photochemical process of film photography. Unlike standard color grading tools that simply remap colors, Dehancer emulates how film actually responds to light, preserves highlight detail through Film Compression technology, and includes over 60 scientifically-accurate film stock profiles based on real lab analysis. After two months of testing on commercial shoots, weddings, and editorial work, it's replaced my entire LUT workflow by delivering genuinely authentic film looks in less time, with the added benefit of exporting custom LUTs for permanent value.
TL;DR: After two months of using Dehancer Pro on real client work, I've found it's the most intuitive film emulation plugin for creatives who want authentic results without spending years mastering color theory. Here's why it works, how to use it, and whether it's worth the investment.
Why I'm Writing This (And Why You Should Keep Reading)
I'm not a colorist. I don't have a degree in color science. I'm a working photographer and videographer who needs to deliver great-looking footage to clients without spending eight hours per project in the color suite.
If that sounds like you, this breakdown is worth your time.
Over the past two months, I've been using Dehancer Pro on everything from commercial fashion shoots to wedding films to sunset beach content. It's replaced my entire LUT workflow, and more importantly, it's saved me hours while giving me better results.
This isn't a paid review. Dehancer reached out and gave me access to test their plugin, but they didn't pay me and didn't tell me what to say. These are my honest thoughts after using it on real projects.
What you'll learn in this post:
Why Dehancer Pro works differently than LUTs (and why that matters)
The complete workflow from import to export
Real-world examples across different shooting scenarios
Whether it's worth the $449 investment
How to get 10% off if you decide to try it
Let's get into it.
The Problem With Most "Film Look" Tools
If you've been shooting digital for any length of time, you've probably tried to get that film aesthetic. Maybe you bought a LUT pack. Maybe you spent hours tweaking curves in DaVinci Resolve or Premiere Pro. Maybe you even convinced yourself that digital grain overlays look "close enough."
Here's the truth: most film emulation tools are just color transformations.
They take your digital footage and remap the colors to look more like film. That's it. They're not actually modeling how film behaves—how it responds to light, how it compresses highlights, how grain interacts with different exposures, how light scatters through emulsion layers.
And that's why they always look... almost right, but not quite.
The highlights clip too hard. The grain looks overlaid instead of organic. The colors feel forced. You can get 80% of the way there, but that last 20% separates "this was shot on digital with a film LUT" from "wait, was this actually shot on film?"
Dehancer Pro bridges that gap.
What Makes Dehancer Pro Different
Dehancer isn't just applying a color grade. It's emulating the entire photochemical process of film photography.
Here's what that actually means in practice:
1. Film Compression (The Game Changer)
This is the feature that made me actually pay attention.
Standard LUTs are lookup tables, they map input values to output values. If your highlights are clipped in your footage (pure white with no data), a LUT can't recover that. The information is gone.
But here's the thing most people don't realize: S-Log3 footage captures way more highlight information than it looks like. What appears blown out in your viewer often still has recoverable data hiding in those near-highlight regions, you just can't see it until you apply the right kind of processing.
Film Compression in Dehancer preserves that highlight gradation by compressing the rolloff the way film naturally does—gently rolling off instead of hard clipping. You're not magically recovering clipped data, you're preserving detail that was always there but would normally get crushed by a standard color transform.
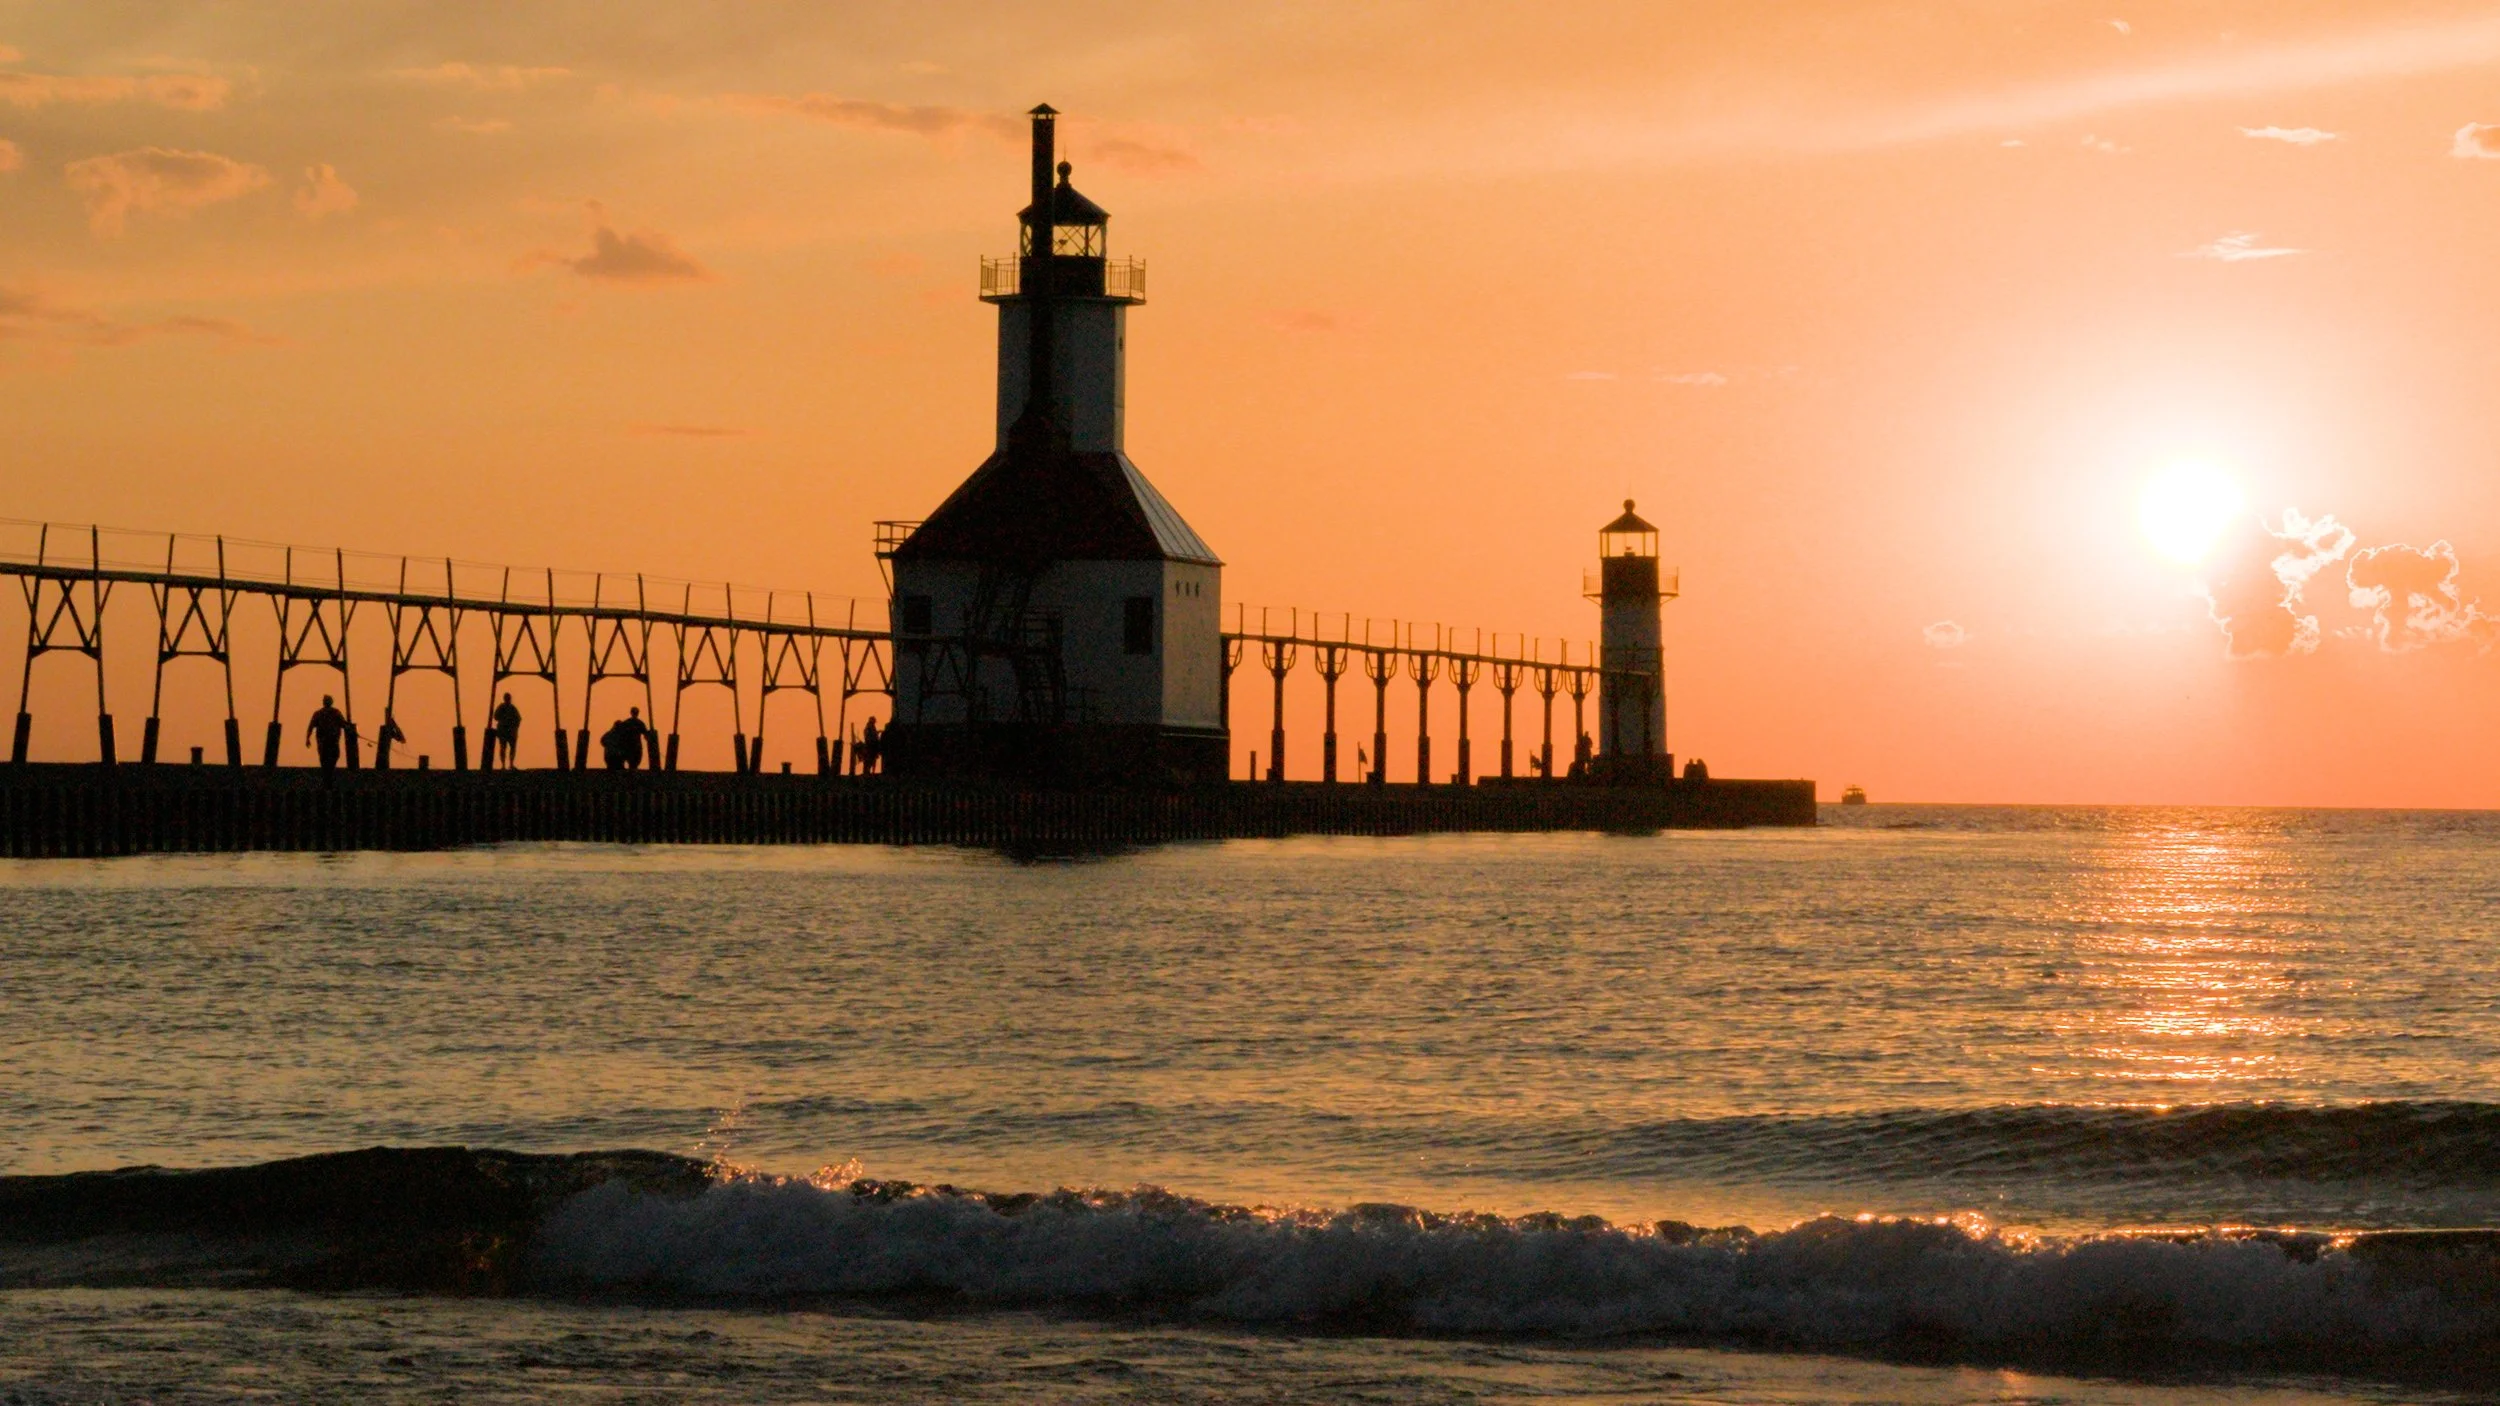
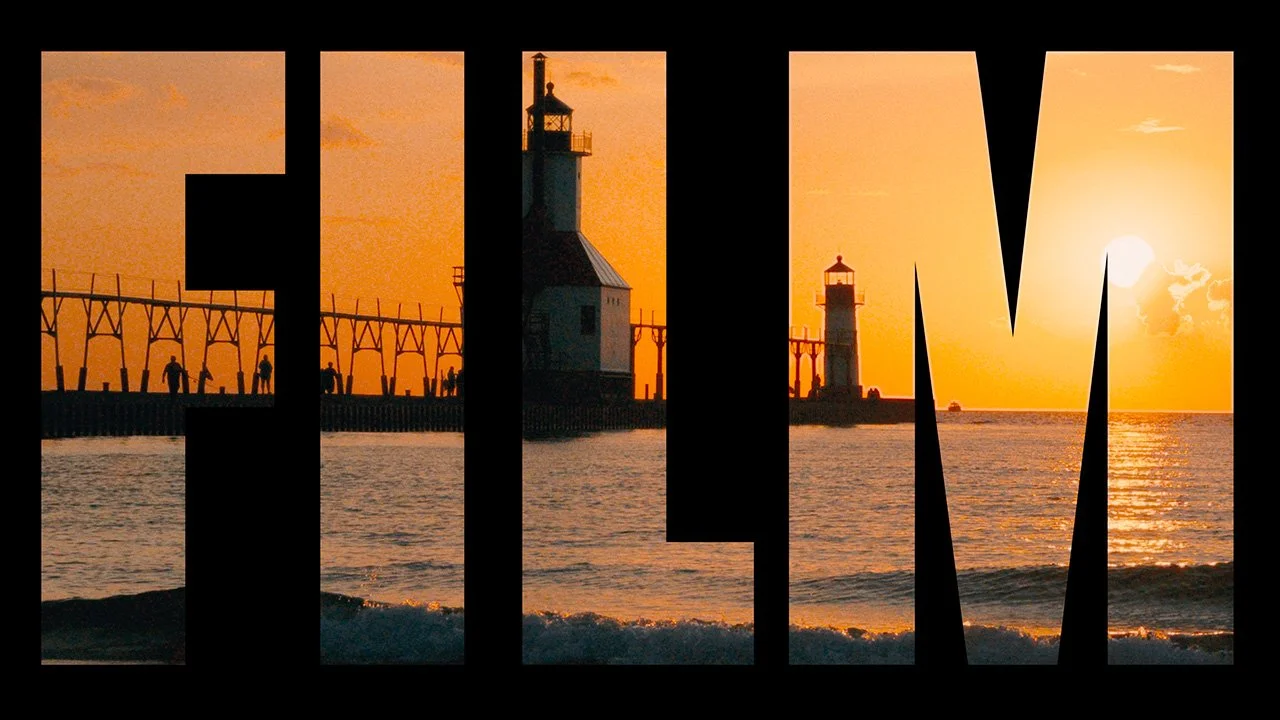
Phantom LUT Highlight Roll-Off Recovery
With my standard LUT workflow, I'd accept some blown sky as the cost of doing business. With Dehancer's Film Compression, I got usable sky detail back while maintaining the natural glow of the scene.

Dehancer Pro Highlight Roll-Off Recovery
That's a deliverable shot vs. a shot I'd bury in the timeline.
2. Authentic Film Stock Emulation
Dehancer has over 60 film stock profiles based on actual lab research of real film.
Not "inspired by" film. Not "looks kind of like" film. Actual densitometry and colorimetry analysis of genuine film stocks.
The library includes:
Kodak Vision3 series (cinema stocks - 250D, 500T, etc.)
Kodak Portra (the wedding photographer's best friend)
Fuji stocks (Velvia, Pro 400H, Superia)
Ilford black and whites (HP5, Delta, Pan F)
Experimental stocks (LomoChrome Metropolis, CineStill)
Each stock has its own color signature, contrast curve, and grain structure. When you select Kodak Vision3 250D, you're getting the same color response as actual 250D film.
3. Real Film Grain (Not Digital Noise)
Most plugins overlay grain as a static texture. It looks like... overlaid grain.
Dehancer models grain the way it actually appears in film, interacting with the luminance and color of your image, varying in intensity based on exposure, creating that three-dimensional quality that film has.
You can choose the film format (8mm, 16mm, 35mm, 65mm), which affects the grain structure, and adjust the size and amount to taste.
4. Halation and Bloom
Halation is that warm orange-red glow around bright light sources in film. It's caused by light scattering backward through the emulsion and bouncing off the backing layer.
Bloom is optical diffusion - the soft, dreamy glow you get from shooting through a Black Pro Mist or similar filter.
Both are physical optical phenomena that happen in real film and real glass. Dehancer models both.
What's great about this: I used to shoot with physical diffusion filters. They're beautiful, but you're committed. If you decide in post that you went too heavy, tough luck.
With Dehancer, I have complete flexibility. Dial it up, dial it down, turn it off, adjust the character. Full control after the shoot.

The Complete Workflow (Step-by-Step)
Alright, enough theory. Let's talk about how you actually use this thing.
Step 1: Installation and Setup
Dehancer Pro is a plugin that lives inside your NLE. They have separate installers for:
Adobe Premiere Pro
DaVinci Resolve
Final Cut Pro
After Effects
Critical: Make sure you download the correct version. Don't just grab the first download link.
Once installed, you'll find it in your Effects panel (Premiere) or under Effects Library (Resolve). There's a free trial with a watermark if you want to test it before buying.
I use it on an adjustment layer in Premiere so the effect applies to multiple clips at once, but you can also apply it directly to individual clips.
Step 2: Input Settings (DO NOT SKIP THIS)
This is the step most people screw up.
When you first add Dehancer Pro, the colors will look completely wrong because it defaults to Rec 709. You need to tell it what camera and log profile you're actually using.
Go to the Input section:
Change Source from Rec 709 to Camera
Select your camera (Sony FX3, Canon R5, BMPCC, etc.)
Select your log profile (S-Log3, C-Log2, V-Log, etc.)
The color shift when you do this correctly is massive. Now Dehancer is actually interpreting your footage properly.
Pro tip: If you're shooting multi-cam (weddings, events), this feature is worth the price of admission by itself. Select the correct input for each camera system, apply the same film stock to all of them, and they match automatically. No more spending hours trying to color-match different camera brands.
Step 3: Choose Your Film Stock
This is where it gets fun.
Scroll through the Film dropdown and pick a stock. There are 60+ options, organized by manufacturer.
Not sure where to start? Here are my go-to stocks for different scenarios:
For bright, airy fashion/lifestyle:
Kodak Portra 160 or 400
Fuji Pro 400H
Kodak Gold 200
For punchy, saturated landscapes/travel:
Fuji Velvia 50
Kodak Ektar 100
For cinematic narrative/commercial work:
Kodak Vision3 250D (daylight)
Kodak Vision3 500T (tungsten)
For moody, contrasty editorial:
LomoChrome Metropolis XR
Kodak Vision3 stocks pushed
For black and white:
Ilford HP5 Plus
Kodak Tri-X 400
Ilford Delta 3200
Each stock has a distinct character. Velvia is known for saturated, punchy colors. Portra is famous for beautiful skin tones. Vision3 stocks are what Hollywood uses.
Step 4: Film Compression and Tone
Now we dial in the look.
Film Compression is where you control how highlights roll off. I typically set Impact to 50-70 depending on the scene. For high-contrast situations (sunsets, windows, etc.), push it higher. For evenly lit scenes, keep it moderate.
Film Developer simulates the development process:
Normal development (0)
Pushed (positive values - more contrast, more grain)
Pulled (negative values - softer, less contrast)
Color Boost brings out colors using perceptual saturation. Unlike a global saturation slider, it preserves skin tones while making skies, foliage, and other elements pop.
Contrast Boost adds film-like contrast—that organic S-curve that gives images dimension.
I keep all of these relatively subtle. Film is beautiful partly because it's not over-processed. Aim for 20-40% on most controls.
Step 5: Print Simulation
This simulates the theatrical print process.
Most cinema films are printed on Kodak 2383 stock. You can toggle between:
Linear (no print simulation)
Kodak 2383
Fujifilm 3513
With print simulation on, you get deeper blacks, warmer midtones, and that optical print quality you see in actual movie theaters.
It's subtle, but it's that final 10% that makes digital footage genuinely look like it was shot and printed on film.
Step 6: Grain, Halation, and Bloom
Grain:
Choose format (35mm for standard cinema look)
Adjust Size (particle size) and Amount (intensity)
Keep it subtle—you're enhancing, not overpowering
Halation:
Choose format (35mm is my default)
Toggle Remjet (on for modern cinema look, off for vintage)
Adjust intensity (20-30% is usually plenty)
Bloom:
Replaces physical diffusion filters
Adjust spread and intensity
Great for adding that dreamy, soft glow
Step 7: Export Your Custom LUT (Game Changer)
Here's where Dehancer becomes an investment that pays off long-term.
After you've dialed in all your settings, scroll to the bottom and hit Generate LUT.
All of that Film Compression processing, film stock emulation, grain, halation - everything gets baked into a single LUT file that you can use anywhere, in any software.
The filename automatically includes your settings, so you know exactly what each LUT represents.
Why this matters: You can use Dehancer's power to create custom LUTs for different scenarios you shoot regularly (sunset beach, indoor tungsten, overcast portraits, nighttime events), then apply those looks like regular LUTs on future projects for instant results.
You get Dehancer's sophisticated processing to create the look, but then the speed of LUTs for application. That's permanent value.
Dehancer Online: Matching Photo and Video
If you're a hybrid shooter (photo + video), this is a killer feature.
Dehancer Online is a browser-based version that works with photos. Same film stocks, same looks, same processing.
Here's my workflow for maintaining consistency across mediums:
Upload JPEGs from my Fuji camera to Dehancer Online
Cycle through film stocks visually to find the right look
Note which stock and settings work best
Apply those exact settings in the plugin to my video footage
Result: Photos and video that genuinely look like they were shot on the same roll of film.
The visual preview in Dehancer Online is incredibly helpful. With the plugin, you're going through dropdowns and testing things. With Online, you can see all the stocks and pick the right one instantly.
Is Dehancer Pro Worth $449?
Let's be real about the investment.
Dehancer Pro costs $449 for a perpetual license. That's not cheap, especially compared to a $49 LUT pack.
But here's how I think about it:
If you're a hobbyist shooting for fun: Probably not worth it. Stick with free Resolve LUTs or a budget LUT pack. Dehancer is overkill for YouTube vlogs and family videos.
If you're a professional delivering paid work: Absolutely worth it, especially if:
You shoot multi-cam events (weddings, corporate)
You regularly deal with challenging mixed lighting
You're a hybrid shooter (photo + video)
You value your time (it's genuinely faster than manual grading)
Plus, you're building a custom LUT library that provides value forever.
What Could Be Better
No tool is perfect. Here's what I wish Dehancer did differently:
1. Performance: Film Compression is computationally heavy. On 4K footage, playback can stutter. Not a dealbreaker, but worth noting. Render previews or work with proxies if needed.
2. Preset preview: You can't see visual previews of film stocks before applying them. You're going through a dropdown. Dehancer Online has visual previews, I wish the plugin did too.
Final Thoughts
After two months of real-world use, Dehancer Pro has genuinely changed my post-production workflow.
It's not magic. It won't turn mediocre footage into masterpieces. But if you're already shooting well and just want your digital footage to have that authentic film character—the highlight rolloff, the organic grain, the color depth—this is the best tool I've found.
The bottom line:
Most authentic film emulation I've tested
Film Compression genuinely preserves highlight detail
Guided workflow keeps you moving (not lost in menus)
Export LUT feature provides permanent value
Dehancer Online makes hybrid shooting seamless
Expensive compared to LUTs
Performance hit on 4K footage
Wish it had visual stock previews
Who should buy it: Professional creatives delivering paid work, especially if you shoot multi-cam events, hybrid photo/video, or regularly deal with challenging lighting.
Who should skip it: Hobbyists, beginners, or anyone on a tight budget. Master the fundamentals first, then consider advanced tools.
Get 10% Off Dehancer Pro
If you decide to try Dehancer Pro, use code HD10 at checkout to save 10%.
👉 Get Dehancer Pro (affiliate link - I may earn a commission at no cost to you)
There's also a free trial with a watermark if you want to test it first.
Watch the Full Tutorial
I put together a complete video walkthrough covering everything in this post, plus visual examples you need to see to understand.
In the video:
Live workflow demonstration
Before/after comparisons with PHANTOM LUTs
Multi-cam matching example
Film Compression in action
How to build custom LUTs
Dehancer Online workflow
Your Turn
Have you tried Dehancer Pro? What film stocks are you curious about? Drop a comment below—I read and respond to everything.
And if you found this helpful, share it with a creative friend who's been struggling with color grading. We all need fewer hours in the color suite and more time shooting.
Transparency note: Dehancer provided me access to test this plugin, but this is not a paid sponsorship. They didn't compensate me or influence what I wrote. These are my honest thoughts after 2+ months of use. Some links in this post are affiliate links, meaning I may earn a small commission if you purchase through them, at no additional cost to you.
About the Author
Henry David is a St. Louis based photographer and videographer helping creatives work smarter and earn more. He specializes in editorial fashion, commercial work, and films. When he's not shooting, he's testing gear, optimizing workflows, and writing about what actually works.

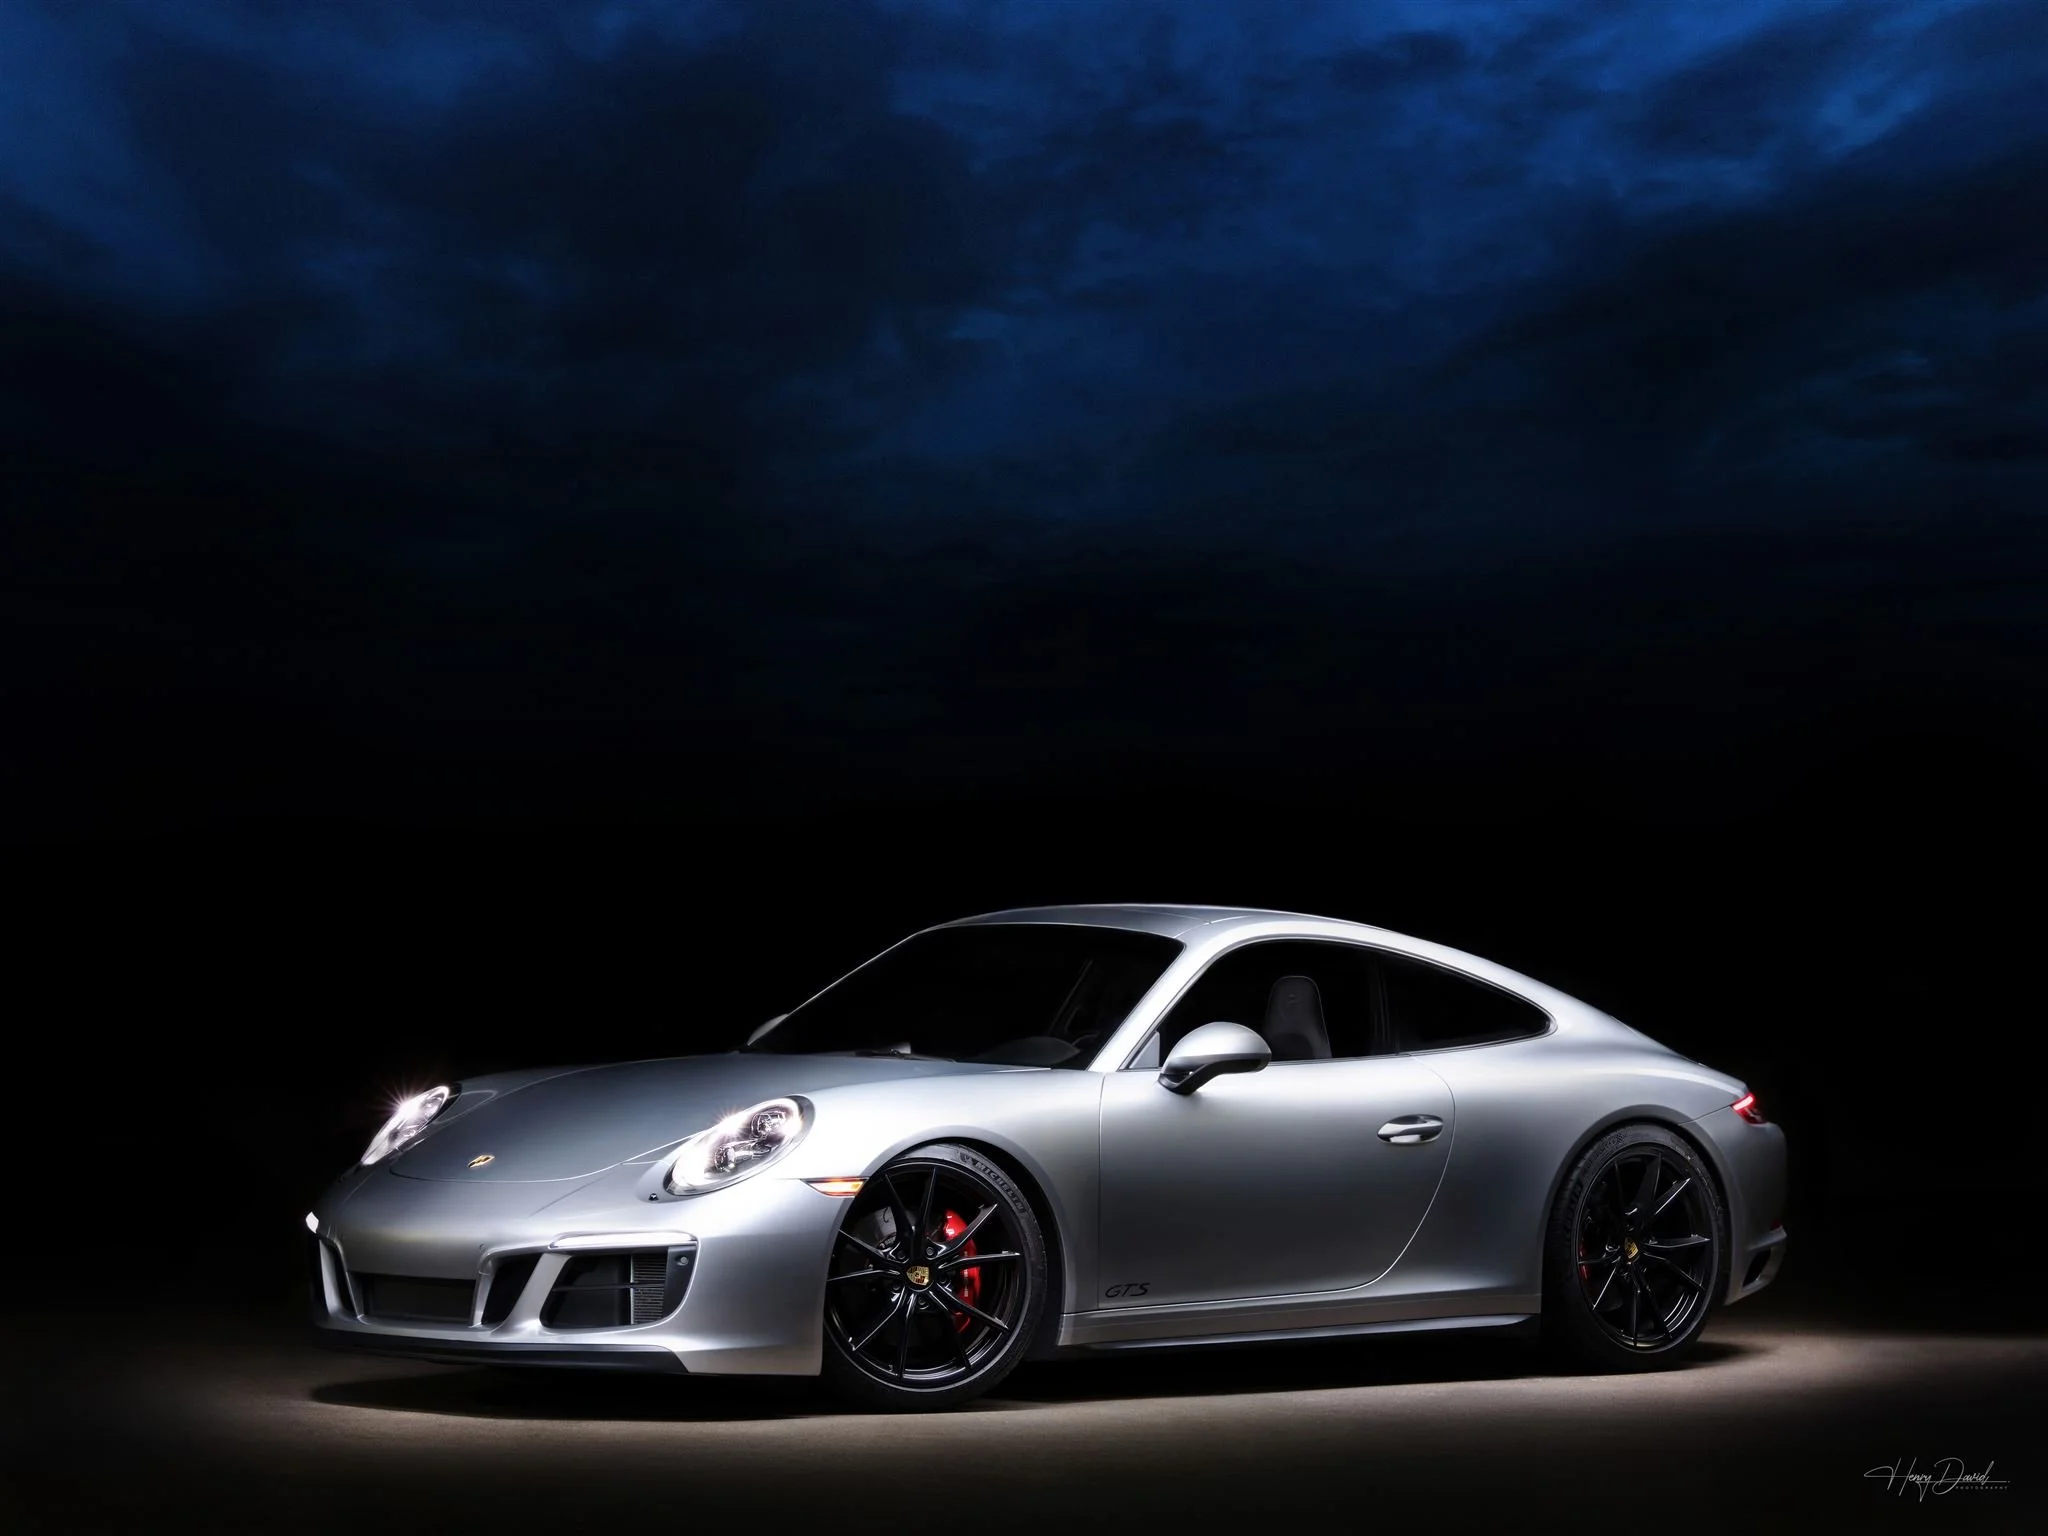
Automotive Light Painting Photography with a Porsche GTS: Full Behind-the-Scenes Guide
This behind-the-scenes breakdown of a Porsche GTS light painting session reveals everything you need to know about automotive light painting photography. From camera settings to lighting techniques, discover how we created cinematic, detail-rich car images using long exposure light painting, perfect for automotive photographers, Porsche enthusiasts, or anyone looking to elevate their car photography.
Learn how we shot a cinematic Porsche light painting image using rooftop location, bulb exposures, and layered light passes.
This behind-the-scenes breakdown of a Porsche GTS light painting session reveals everything you need to know about automotive light painting photography.
From camera settings to lighting techniques, discover how we created cinematic, detail-rich car images using long exposure light painting, perfect for automotive photographers, Porsche enthusiasts, or anyone looking to elevate their car photography.
I recently had the pleasure of working with Chris, the proud owner of a stunning 2018 Porsche GTS, to create a light-painted automotive portrait that blends technical precision with creative storytelling. This blog is a behind-the-scenes look at how we used light painting to turn a car into a work of art, capturing images you simply can’t get with natural light alone.
1. Choosing the Right Location: A Rooftop Advantage
For this shoot, we selected the rooftop of a parking garage. Rooftops are ideal for automotive light painting, flat, expansive, and usually free from distracting clutter. They offer room to move around freely and reposition the car to optimize reflections and composition.
We picked a dark section of the rooftop, well away from overhead lamps and other ambient light sources. The darker the environment, the better, because every bit of unwanted light reduces your control. In light painting, you decide where light falls. Starting with a blank canvas of darkness gives you full creative control to build contrast, drama, and nuance, one stroke at a time.
2. Setup and Tethering
Once we arrived on site, here’s what our setup included:
Tripod to keep the camera absolutely locked down
Tethering with TetherTools to a laptop running Adobe Lightroom Classic for real-time feedback
Lights:
Godox LC500 with modified barn doors for sweeping, broad passes
Eagtac flashlight with Harold Ross modifiers for precision detail lighting
ColorChecker Passport 2 from Calibrite for accurate color calibration
Tethering was key. It let us evaluate every light pass immediately, checking highlight clipping and exposure levels in real time. While we typically aim to ETTR (Expose to the Right) to preserve shadow detail, in light painting we’re extra careful not to blow out highlights, especially since we’re layering multiple exposures.
Safety Tip:
Secure your tethering setup! We used a non-slip pad on a portable table weighed down with sandbags. Even a light breeze can tip over your gear, so plan accordingly.Once on site, we built our setup:
3. Framing, Composition, and Camera Settings
Once the Porsche was in position, we dialed in the technical settings. These are crucial in light painting:
ISO: Lowest native ISO (usually ISO 100) to maximize image quality and reduce noise
Aperture: Between f/16 and f/22, depending on your lens’ diffraction handling. These smaller apertures give maximum depth of field - essential for full-car sharpness.
Lens Choice: We opted for a 100mm prime on full frame for some subtle compression. Zoom lenses or other primes can work too, bring options to decide on-site. For certain angles, using a circular polarizer can help reduce unwanted reflections on the car’s windows or body panels.
Shutter: Bulb mode + remote trigger (we used the Oppilas which is readily available on Amazon), be sure to use a trigger that allows for usage on the Bulb setting.
Additional Camera Settings:
Turn off Long Exposure Noise Reduction – it slows down workflow and can introduce unwanted artifacts
Disable IBIS (In-Body Image Stabilization) – during long tripod exposures, IBIS can cause micro-vibrations
Double-check focus at your working aperture, then lock it in
Don’t bump the tripod, or the car! Even slight movement can ruin layer alignment. You cannot fix misaligned light passes later in post.
Pro Tip:
Work with a teammate, preferably the owner of the car! It’s more efficient, more fun, and safer for your gear. Have your teammate be triggering the opening and closing of the shutter while you control the application of light, or vice versa.
4. Building the Image with Light, in five simple steps
Light painting is the art of layering exposures over time, with each pass selectively lighting a different part of the subject. In post-production, typically in Photoshop, we combine those layers to create a cohesive, polished, and dimensional final image. The brightness and quality of each exposure will depend on three key factors: the size of your light source, how fast you move it, and how close it is to the subject. Keep in mind that the inverse square law applies, light intensity increases dramatically the closer you are, so small distance changes can have a big impact.
1. Base-Fill Pass
We started with broad sweeps using the LC500 to create a soft, even exposure across the entire car. While the light itself isn’t huge, movement over a long exposure makes it act like a massive softbox, smooth and flattering, since it is the size in aggregate captured over time that is ultimately the light source. With light painting, the really cool thing is that you get to determine the characteristics of your light modifier!

Base Fill Layer with relatively even exposure
2. Top-Down Passes
Next, we extended the light wand overhead using a monopod extension - use something sturdy, the last thing you want is for your light to accidentally damage something so valuable as a Porsche GTS.
These top-down sweeps introduced bold contrast and shadows that give the image dramatic structure. These passes often form the foundation of your final look.
Pro Tip: Try multiple angles and elevations to give yourself options.
Look for a clean light streak that follows the contour of the car, it will likely be the “hero” pass in your final composite. Also watch the shadow cast on the ground, it forms its own visual line, so make sure it looks intentional.
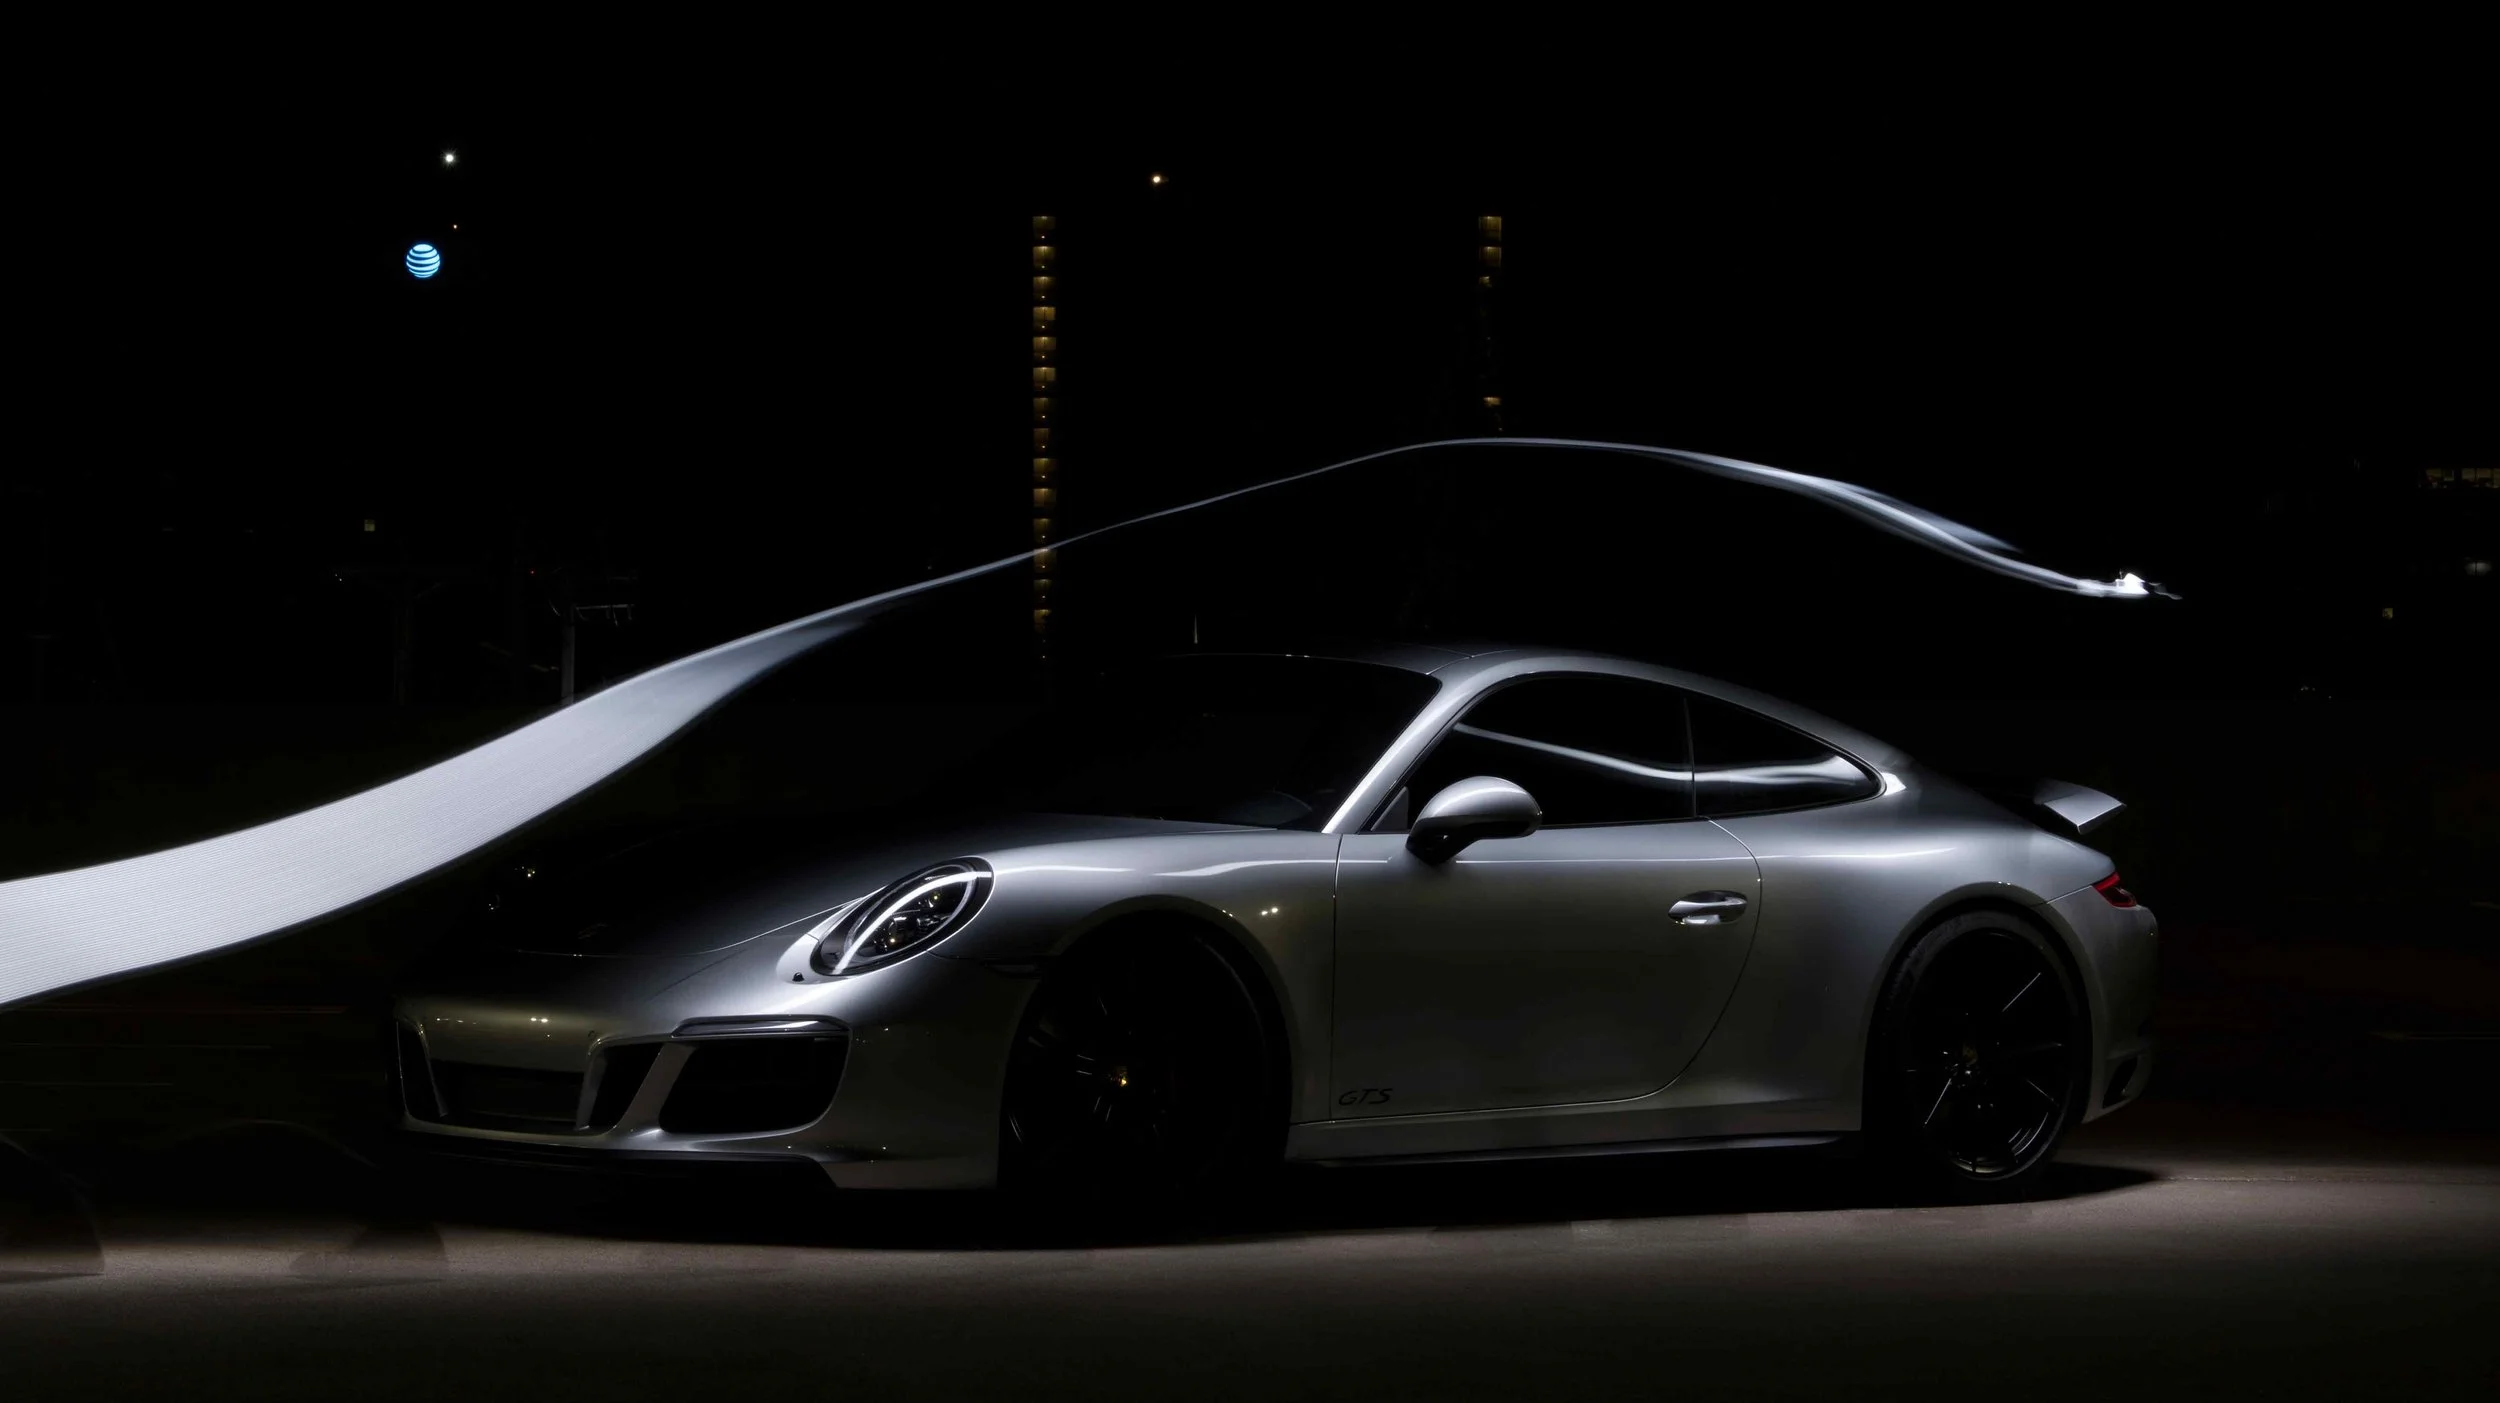
A Top-Down Pass over with the Godox LC500 safely extended over the Porsche GTS yields dramatic results.
3. Detail & Accent Lighting
Now we fine-tune. Use a smaller flashlight to light:
Wheels and rims (have the driver slightly rotate them for a strong angle of the full wheel)
Interior seats, dash, and steering wheel
Badging, trim, emblems, and surface highlights
We had Chris turn on the headlights and taillights to capture those iconic glows. These add life and realism when blended into the final composite.
Ask the car owner what details matter most to them. Chris, for example, pointed out the beautiful leather stitching on the interior as well as the rear spoiler, so we made sure to capture those elements.


4. Rim Lighting / Backlighting
One of the most cinematic touches: a subtle rim light from behind. This outlines the vehicle and creates beautiful separation and pop from the background.

Rim Lighting from Behind the Porsche for a dramatic outline.
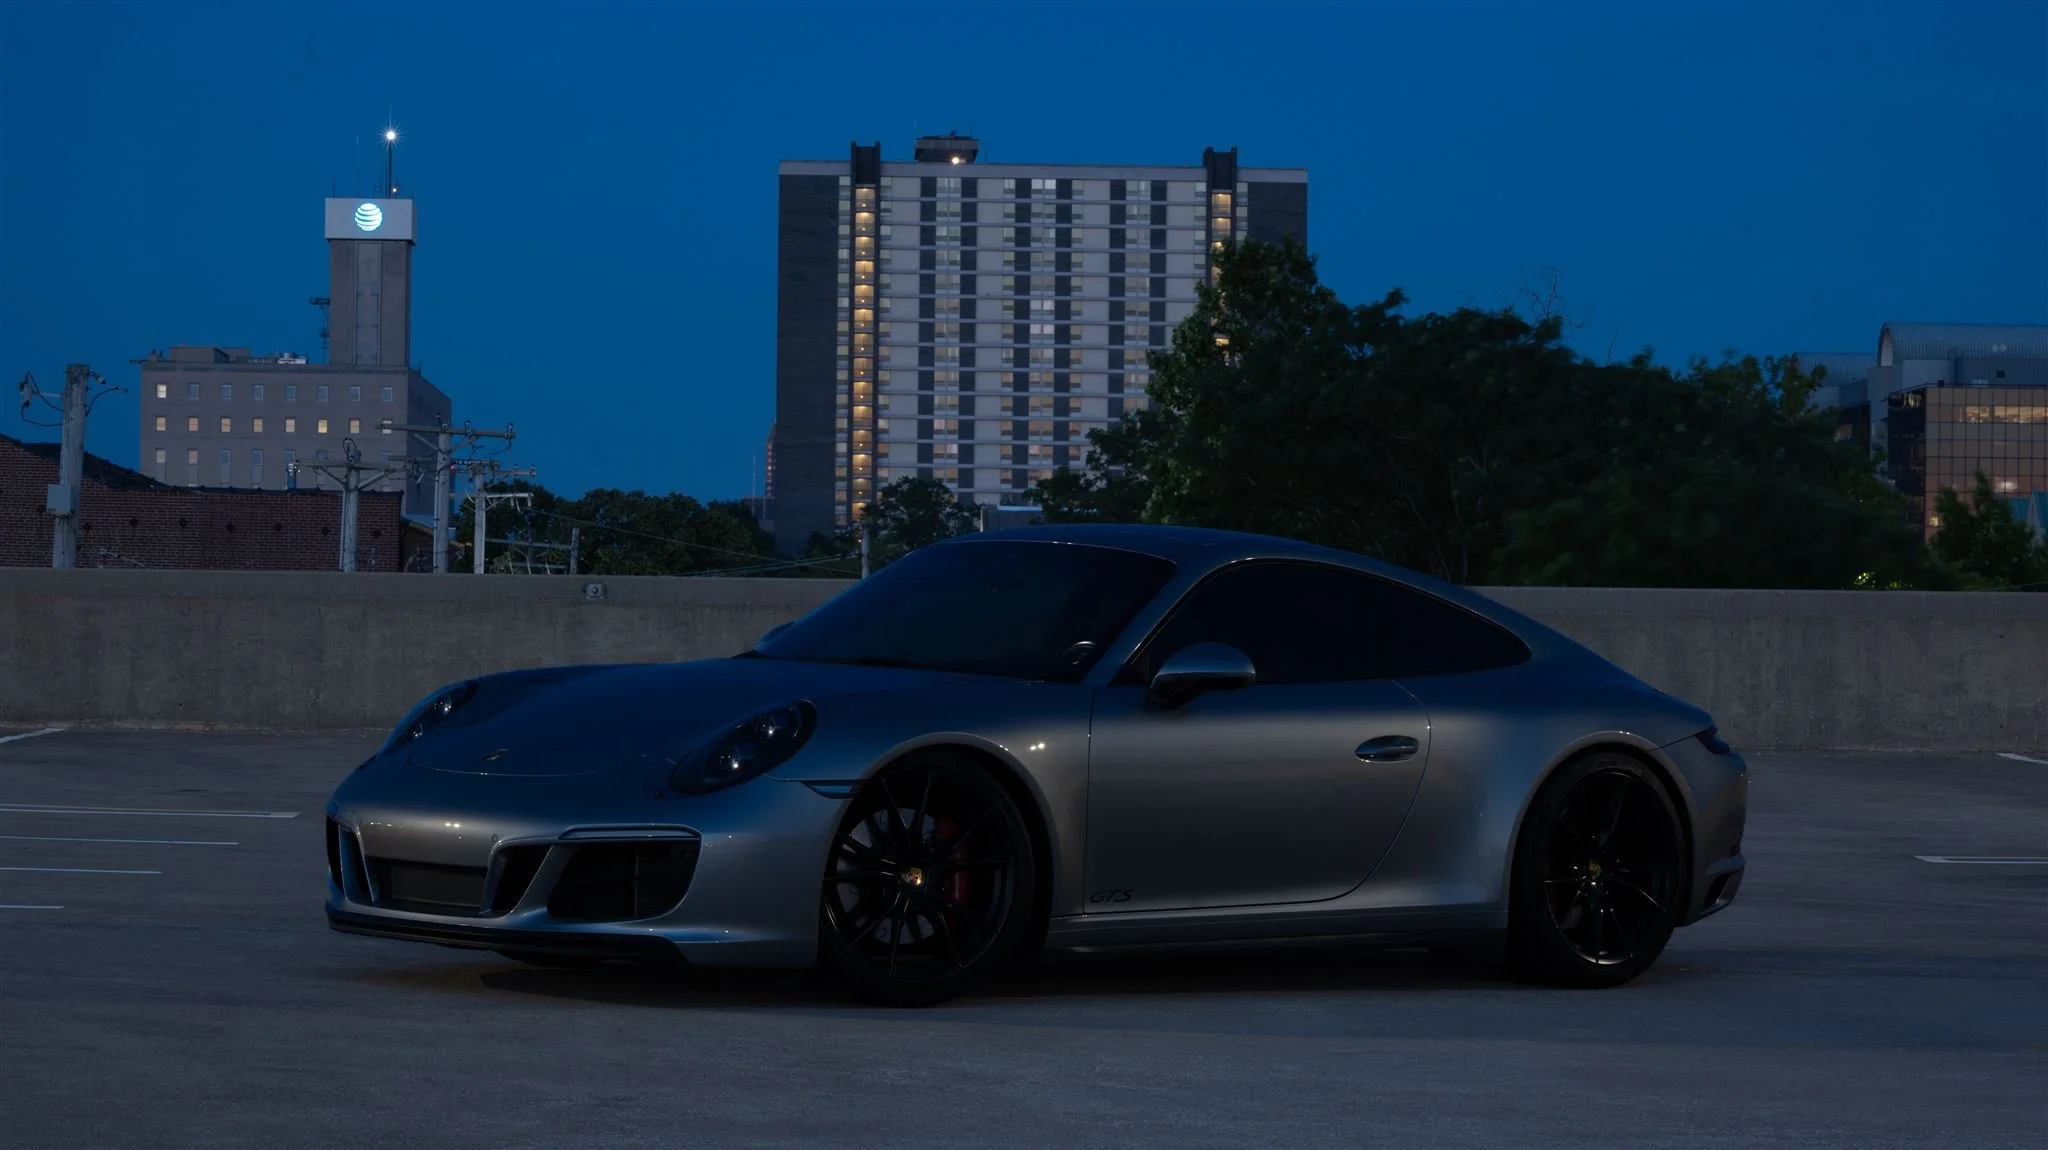
5. Capture a “Before” Image
Before wrapping the lighting, take a shot without any light painting. Let the ambient light (or sky) expose naturally. This gives you a dramatic “before” for comparison, and can serve as a base for compositing a clean background later. You can also do this step before starting the light painting as your framing up your image.
5. Post-Processing: Where the Magic Happens
Once back in the studio, we import RAWs into Lightroom and apply a calibrated color profile for the light source. Make basic exposure corrections to preserve your highlight detail and shadow depth.
Photoshop Compositing
In Photoshop, each light pass becomes a layer. Using masks, we selectively reveal only the best-lit parts from each. This additive process builds up a clean, dimensional final image.
We recommend working in 16-bit sRGB throughout for best results and smooth tonal transitions.
Sharpening & Background Work
Once the image is composited and flattened, use AI-assisted sharpening tools like Topaz or Photoshop Neural Filters. Be gentle, over-sharpening can introduce banding in smooth gradients like skies or reflections. Apply sharpening selectively to details only, using layer masks.
If needed, composite in a new background. You can often use the original, but in our case, we replaced the sky with a cloud layer for added atmosphere. Match perspective, focal length, lighting temperature, and shadow direction to blend it believably.
Final Thoughts
Light painting a car like Chris’s Porsche GTS is a perfect marriage of technical precision and creative expression. It requires planning, teamwork, patience, and a genuine love for the craft and subject.
Unlike standard car photography, this approach is slow, deliberate, and deeply satisfying. You're not just capturing an image, you're building one, piece by piece. It’s a chance to fall in love with photography all over again.
If you're a car enthusiast, creative professional, or just someone who wants their vehicle immortalized in this otherwise unachievable, cinematic style, let’s connect. I’d love to collaborate and create something truly one-of-a-kind for your prized machine.